Getting Started
Welcome to the Biogrammers Alexa Wake-on-LAN and Remote Shutdown project. This guide will help you set up your environment to wake up your computer using Alexa and perform remote shutdowns via our secure agent.
This project started with a simple problem: expensive, paid subscription models for a feature that should essentially be accessible to everyone. As an independent developer, I decided to build a free, reliable alternative to help the community wake their computers from anywhere in the world without a paywall.
While providing this service for free, growing the project brings its own challenges.
My goal is to keep this service alive and free for as long as possible. If this project has saved you time or money, consider supporting its growth. You can make a one-time donation via Gumroad or become a monthly patron on Patreon to help cover server costs and fuel future development.
Your support keeps the servers running! 🖤
1. Hardware & BIOS Configuration
Before using the software, your hardware must be ready to receive a "Magic Packet" while in sleep or powered off state.
- Network Connection: A wired Ethernet connection is highly recommended. WiFi (Wake-on-WLAN) is supported by our software but rarely supported by PC motherboards.
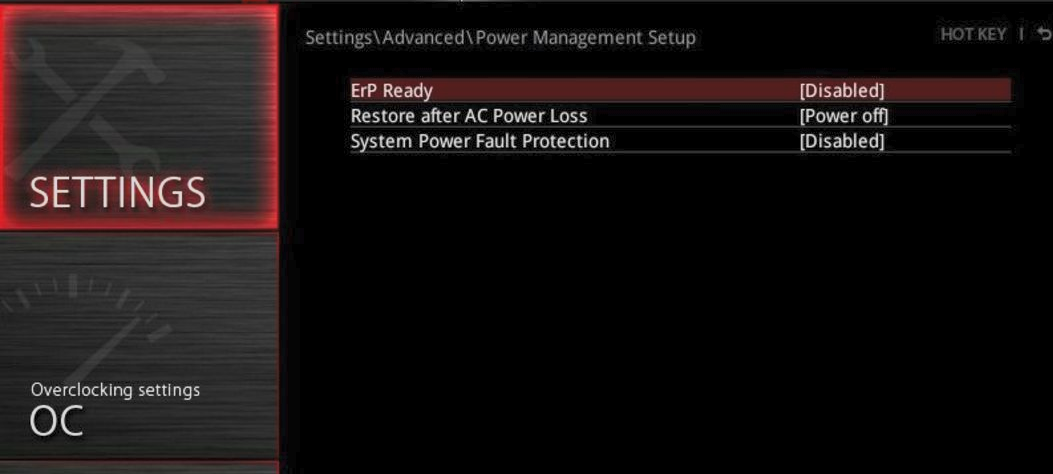
- ErP Ready: Restart your PC, enter BIOS, and set ErP Ready to
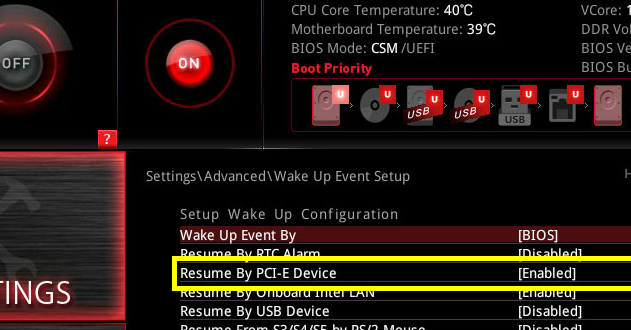
Disabled. This ensures the network card stays powered when the PC is off. - Wake Up Events: Enable settings like "Resume by PCI-E Device" and/or "Wake on LAN from S5".
Click image to enlarge
Click image to enlarge
2. Windows Device Manager Setup
Windows might put your network card to sleep. Let's prevent that:
- Right-click Start -> Device Manager.
- Find your Network Adapter, right-click -> Properties.
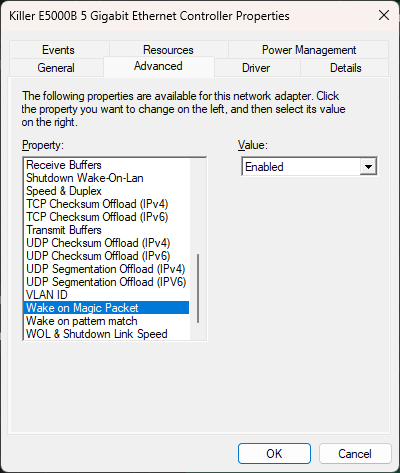
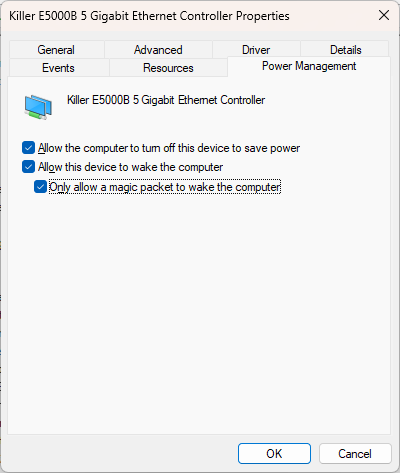
- Under Power Management, check "Allow this device to wake the computer" and "Only allow a magic packet to wake the computer".
- Under Advanced tab, ensure "Wake on Magic Packet" is
Enabled.
Click image to enlarge
3. Web Portal & Package Download
Go to wol.biogrammers.com and sign in with your Amazon account.
- Define your PC (Friendly Name and MAC Address).
- Maximum 3 devices allowed per account.
- Click "Download Package". Your browser may warn about "Suspicious File"; please select "Keep" as the file is a custom executable.
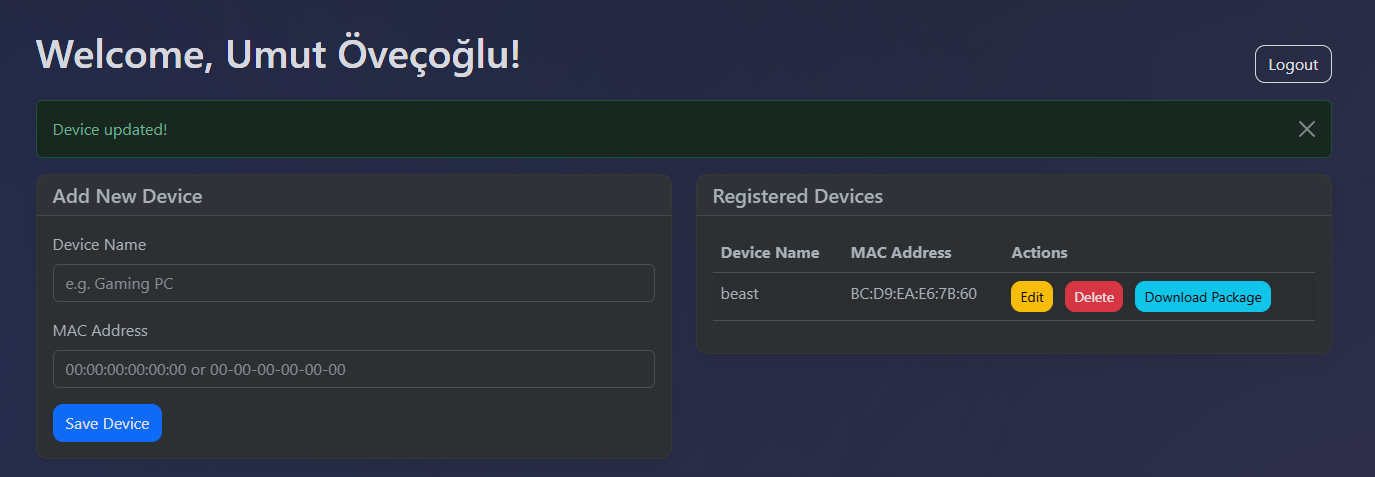
Click image to enlarge
The system needs to identify your AWS Region through Alexa first. Follow this order:
1. Add your device on our web portal.
2. Enable the Skill in the Alexa App.
3. Run "Discover Devices".
4. Logout & Login to the web portal to download your ZIP.
4. Alexa Integration
Now, let's link the cloud services:
- Open Alexa App, search for our Skill and click Enable.
- Complete the Account Linking process in the popup.
- Once linked, Alexa will automatically start Discovery.
- Your defined PCs will appear as new devices. You are ready!
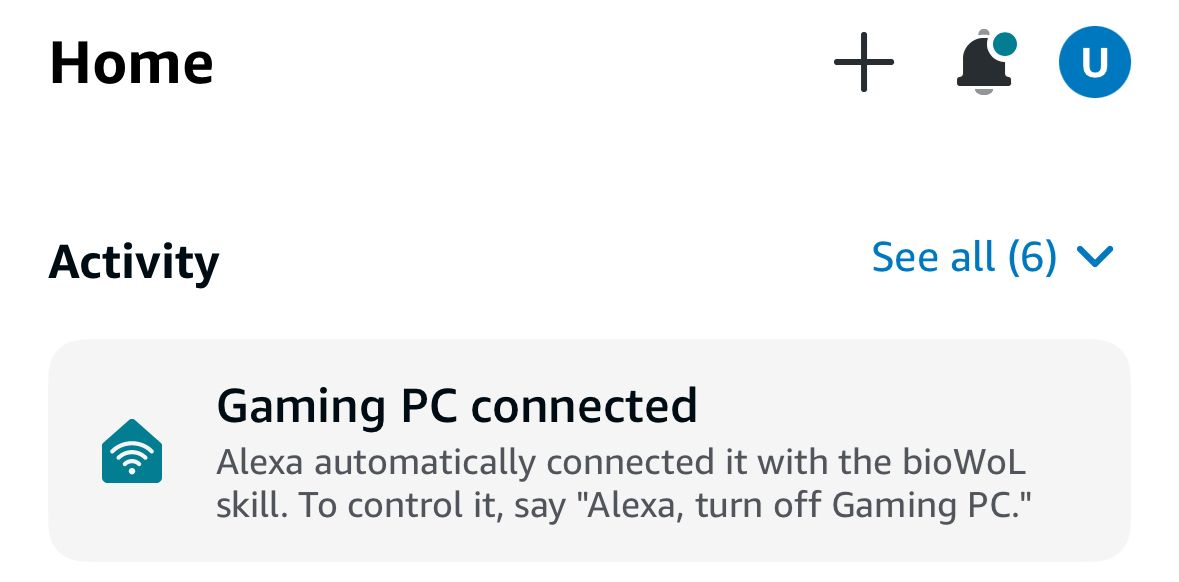
Click image to enlarge
5. Installing the Agent
Final step is the Agent Service Installation:
The WolClient.exe can be run manually, but for a permanent solution, you should install it as a Windows Service.
To use Remote Shutdown and see real-time Power State, install the Agent as a Windows Service.
.bat files as Administrator.
- installer.bat: Automatically stops the existing service (if any), updates the files, and starts the service.
- uninstaller.bat: Safely stops and completely removes the service from your system.
You can tweak your config.ini before installation:
[DEFAULT]
enable_log = true      # Set to false to disable text logging
shutdown_timeout = 10  # Delay in seconds (not applicable for hybrid options)
shutdown_option = 1    # 1: Normal, 2: Force, 3: Hybrid, 4: Hybrid+Force
WolClient.exe: The main agent.installer.bat/uninstaller.bat: Service management tools.nssm.exe: Helper tool for Windows Service conversion; you don't need to run it manually.config.ini: Your unique configuration.
6. Troubleshooting & Diagnosis
If WOL is not waking your PC, try these steps in order:
- Windows Fast Startup: Disable "Turn on fast startup" in Power Options.
- BIOS Fast Boot: Disable "Fast Boot" in BIOS settings.
- Power Supply: Ensure your PSU is switched on and the motherboard LAN LEDs are blinking while the PC is off
WolClient.exe is running and enable_log is showing a successful connection.